New project idea

Assignment,Final Project — John Mars @ 8:32 pm

I have a new idea for my final project: a Tangible Command Line (working title)

The concept of the unix terminal is a difficult one to grasp if you haven’t grown up with it. My idea is simple: provide a tool for learning how to use the command line, by converting archaic black-on-white cryptic text to physical blocks, flags, and connections. There are a variety of tools out there that attempt to do the same thing, but nothing I could find that reaches into the physical world.

Some inspirational products:

Illucia

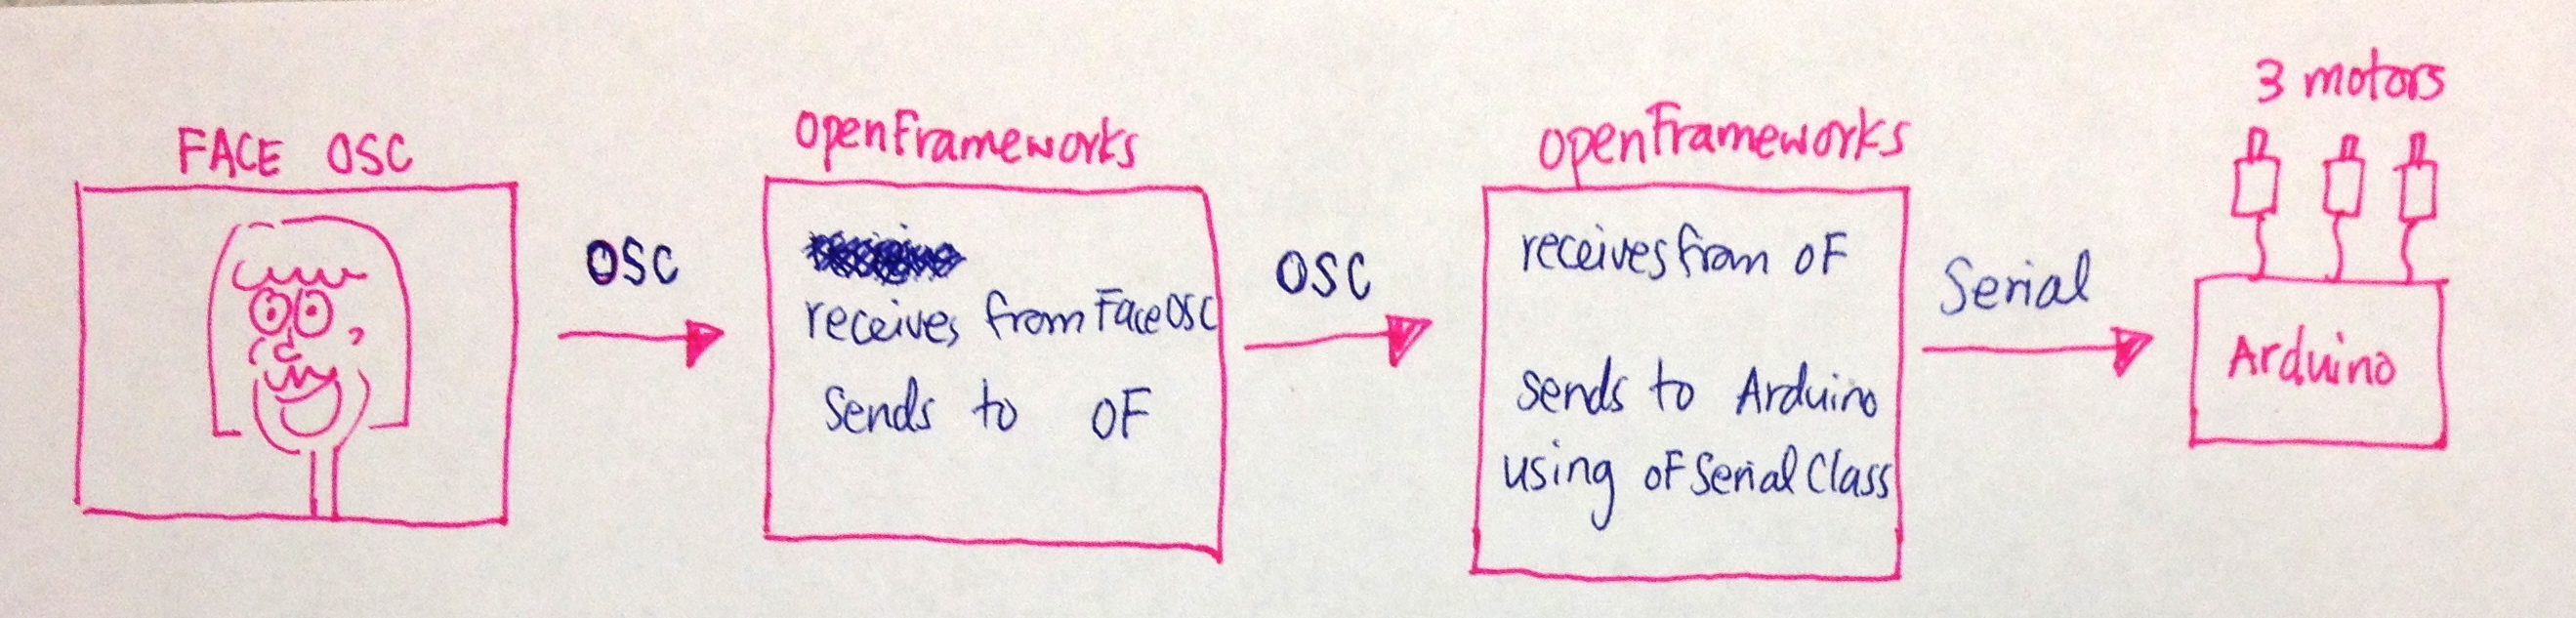
Illucia is a video game controller inspired by Moog and Buchla devices. It passes OSC commands via physical wire between programs.

Littlebits

Littlebits are small single-purpose electronic components that connect together with magnets to produce an easy-to-make circuit.

explainshell.com

A website that prompts the user for a complicated shell command, and returns it annotated with relevant manpage sections.

Example commands and concepts:
Pipes (|), Redirects (>/<), Flags (-), sudo, ls, cd, grep, ssh, vnc, make, python, nano, mv, cp, rm, chmod, mkdir, pwd

Project 2, Assignment 3 – OSC – Lights

Assignment — tdoyle @ 8:33 am

For the third micro assignment, Priya and myself worked together to create an OSC application that communicates between two computers. One computer takes input and the other outputs to a physical output. We decided to create a prototype of what could be turned into a controlled light array. One of our computers took in keyboard input and the other relayed the information to the arduino which turned on lights depending on the key pressed. We used three small light bulbs and mapped the keys ‘j’, ‘k’, and ‘l’ to them. For a nicer effect, we added some code to fade the light bulbs. Additionally since the lightbulbs required more than the 5V the arduino could supply, we used a transistor and external power supply to create the finished product. Below are links to the github repos with the source code. Note that the arduino code is in the LightReciever repo.

(more…)

pd + OSC tutorial

Hardware,Software,Technique — Tags: , , , , , — epicjefferson @ 12:40 am

pdOSC

I made a quick tutorial on how to use OSC to communicate 2 devices running pd and use the [pduino] object to control each other’s leds and solenoids. yay!

github.com/epicjefferson/buttonOSC

Hand-gesture controlled sound synthesis

One of my main interests is working with interfaces for sound synthesis. Over the years I’ve been experimenting with a few different techniques to see how different interfaces inspire different styles of performance and how the interface affects the sound produced. Without having a clear goal, I’ve delved into circuit bending/ hardware hacking, computer-vision, touch screens and web/text based systems. Here are some of my findings:

Circuit Bending

Elvis box – Circuit Bent DS-1 Distortion

Circuit Bending provides a great introduction to incorrect electronics, the idea is that you use wires to randomly create connections within existing circuits (using only battery power, for safety) and explore the effect these connections have on the sound (or visual). I think this wires the brain in a great way because you expect failure, instead of total control you have only curiosity and luck. This got me thinking about how I was going to control these sounds. Why had I decided to use buttons, patch cables and knobs?

(more…)

Project 2.03 — OSC — Patt and Alan

Assignment,Technique — pvirasat @ 10:54 am

Here is our project, which shows some of the basic use of OSC protocol!

Password: pattandalan


The images below show how things talk to each other, and the wiring diagram of the motor (using a 2N7000 transistor and an external power supply):

how things talk

motor circuit diagram with 2N7000


Also, here is a video of another test we did where we hooked up a light sensor to a raspberry pi, and used it as a digital input. Then, we sent the data (through OSC) to an openFrameworks application on another computer, which connected to an Arduino (through Serial) and controled the motors.

Password: pattandalan

Here’s the code: Github

“Knock” by Yeliz Karadayi and Epic Jefferson

Uncategorized — ygk @ 7:44 am

Knock is a more intimate way to connect with specific people on campus. Use it to signal for help, that you’re heading over, or just to drop in on a friend.

GitHub Student Developer Pack

Uncategorized — John Mars @ 6:28 pm

Hey guys,

If you don’t know, GitHub has an sign-up option for students, which in the past included their Micro Plan for free. They’ve just updated it with a ton of new promotions, including:

  1. A free GitHub Micro plan
  2. $100 credit at DigitalOcean, a VPS provider (I use them to host my websites)
  3. $25 for HackHands, live programming help 24/7
  4. A free .ME domain from Namecheap
  5. Waived transaction fees from Stripe
  6. Free private builds from Travis CI
  7. The Unreal Engine for free

There’s more there, too.

Sign up at education.github.com/pack, like right now.

Serial_OSC example oF code

Uncategorized — Jakob Marsico @ 1:34 pm

Here’s a link to the github repo with Eric’s example code from last week. This should get you started using OSC and Serial communication within openFrameworks on your laptop.

Github Repo


Wired Magazine: Even More Raspberry Pi

Reference — delce @ 4:36 pm

Some interesting hacks with a raspberry pi

www.wired.com/2013/01/even-more-raspberry-pi-projects/#slideid-357791

Project 02 – Spy Device – iSpyLenny

Assignment,Submission — alanhp @ 4:19 pm

The password is: ispylenny

Screen Shot 2014-10-03 at 4.15.37 PM


Screen Shot 2014-10-03 at 4.16.11 PM

Screen Shot 2014-10-03 at 4.17.09 PM

Screen Shot 2014-10-03 at 4.17.32 PM

Concept: iSpyLenny is a remote dog monitor to spy / see my dog who is in South America while I am in the US. A pressure sensor sits below his bed and senses when he stands on it. When this happens, a picture of him is taken by the PS3 Eye webcam which sits next to the bed. This Picture is then saved on the RaspberryPi and uploaded to Dropbox from the device. Once the photo is uploaded, an IFTTT block is activated and a notification is sent to my phone with a link to the picture.

The process for getting this to work was a lot harder than I expected. The simplest part was to get video capturing working using the built in functionality in openFrameworks. The more complicated part for me was with the wiringPi and with the uploading images to Dropbox. The wiringPi part is technically very simple but I had a big misunderstanding of current flow and of the way resistances worked. Once I got help on that from Jake it wasn’t hard. The other part that was hard was the Dropbox uploader, in particular what I found the hardest is understanding how to locate from a terminal command all of the files I needed, so using file paths for where the script was, for the location of the image on the RaspberryPi and for the location of the Dropbox folder. One issue which I ran at the end when combining both the picture taking and the wiringPi is that the picture being taken was just grey, even though I was using the exact same code from the working file, I think it had something to do with the way the project was created and the addOns and settings made when creating it. I tried a couple of different ways of solving this but after two hours it seemed like it wasn’t justified and I just decided to leave it.

Some lessons learned:

  • Terminal commands can be run from openFrameworks code so you can essentially do anything outside of openFrameworks using openFrameworks.
  • Current flows to where its easier for it to flow, a resistor will make it harder for the current to flow in that direction.
  • File paths… ../ go back one directory folder1/folder2/folder3 go to folder 3… ../../../folder1 go back three directories and then enter folder1.
  • There are some problems which are probably not worth solving, i.e. when the returns are really tiny compared to the effort you’ll dedicate
  • IFTTT blocks run every five minutes.


« Previous PageNext Page »
This work is licensed under a Creative Commons Attribution-Noncommercial-Share Alike 3.0 Unported License.
(c) 2024 Making Things Interactive | powered by WordPress with Barecity